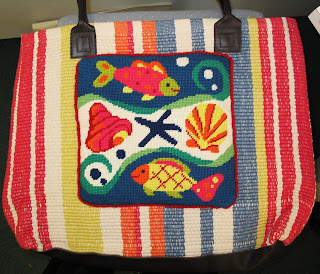
When I went to Chatham, MA, on Cape Cod the end of September, one of the items I took with me to stitch was a 10mesh canvas for a Pischke Pocket tote bag.
This shows the unstitched canvas resting on the tote bag. During my visit, I managed to stitch about two-thirds of the canvas. I completed the remainder this past week in my spare time (small joke). And then to follow the instructions for finishing that were included in the kit. Hmm. First I locate some lightweight fabric in Needle Nicely's fabric stash (don't ask--I haven't added to it since Hurricane Wilma). Then I sew the fabric to the front of the needlepoint, leaving an opening for turning the canvas. I left about 4"--not enough. Had to pick out another inch or two. Please don't notice the fold marks. I forgot to bring the iron.
This shows the front of the canvas after successfully turning it. Remember that the opening for turning is on the bottom of the finished piece. It's less obvious that way. You hand stitch it closed.
Those corners could be a tad sharper, but I decided round was "a good thing". The finishing instructions call for the blanket stitch as an edging. I personally don't like the blanket stitch. I think it looks home-made, which of course it is. I decided to use the enclosed tapestry wool to make a twisted cord to be the edging of my pocket. Also included was some overdyed cotton. I couldn't use it for my cording because it was precut. Pshaw!Directions for twisted cording: measure the dimensions of the canvas (in this case 10x10x10x10). Multiply by 2.5 (or 3 if you're the nervous type). That's how long to measure the first strand. In my case that was 40x2.5= 100". I had enough yarn in the skein to do 3 strands which when twisted into cording becomes 6 strands. You tie the 3 strands together, tape one end to a surface and start twisting. Some people insert a pencil in the end you are twisting. Twist and twist and twist, even after you think you have done enough. At this point it helps to have someone help you. They stand in the middle of your strand and hold it while you double back to the beginning. If it twists on itself, you are done. If it doesn't, untangle it and twist some more. When you have twisted enough, straighten the twist so it looks pretty. Here's mine:
The next step is to use the perle cotton included in the finishing kit to attach the pocket to the tote bag. You must double or triple tack the top edges so they will withstand the tough usage that edges get. Then just attach the pocket to the tote bag, remembering to keep it above the inner leather lining (you can't see it on the outside, but can feel it inside). I inserted one end of my cording into the right bottom of the pocket, about 2 inches from the right edge, before I started sewing down the pocket. I wanted to be sure that I had a big enough hole for the cording to fit in and doing it first provided that (it was then easy to insert the other end of the cording when I was finished tacking it down). Envision this, I have finished tacking down the pocket. It should feel secure. Now start slip-stitching the cording in place. This makes the edge of the pocket look more attractive. Along the top of the pocket I switched to a colored thread (2-ply DMC floss) to attach the cording across the top of the pocket for a more finished look. Now down the right side and insert the end into the opening created by the first end and double or triple tack them into place. I must admit that sometimes I felt like I was wrestling an elephant--the tote bag has some weight to it.
Here's my finished product (a thing of beauty!):


To someone who doesn't sew, it seems like a lot of work. But it sure looks great!
ReplyDeleteI totally agree with Anne's comment! I'm happy to needlepoint, but when it comes to finishing anything, I'm happy to send it to the professionals! Love the bag though, very Florida-y!
ReplyDelete